Tuesday, November 8, 2011

Chorizo en Casa

Food is perhaps the most effective memory trigger for me. For others it might be a smell, or a sound, or a color combination. For me it is food. One of the food items that makes my tongue wag at mere mention is chorizo.

Chorizo is, for me, a guilty pleasure. Yeah, it is just pork and spices, but somehow something that tastes that good must be bad. Several memories spring up immediately. I used to love having chorizo in my burritos at Hacienda del Sol. I remember some great chorizo tapas at a bar outside the Picasso Museum in Barcelona. I regularly enjoy chorizo in my breakfast burritos today.

There are two kinds of chorizo: Spanish (made from chopped pork and smoked paprika) and Mexican (using ground pork and red chiles). Usually the Spanish version can be found cured or smoked and can be sliced and eaten straight away. Mexican chorizo is usually sold raw in bulk or links (the Spanish would call this chorizo fresco). Generally it is the Mexican style that we find in the grocery stores in the states and usually cut it out of the casings and cook it up.

My friend Julie on time asked me "Have you ever read the ingredients list?" I admitted that yes, I had, but I like it and therefore I just eat it and ignore the label. It did get me thinking that perhaps in my quest for making things myself and controlling the ingredients lists I should give chorizo a shot. I present to you here the results of my efforts. As always, I would appreciate your feedback.

The obvious way to use chorizo is to brown it and add to tacos or burritos or salads. But why not try:
  • add browned chorizo to cottage cheese (perfect if you are on one of the caveman diets)
  • substitute chorizo for Italian sausage in your regular spaghetti sauce
  • add one pound raw chorizo to one pound buffalo or lamb for some fantastic burgers
  • make it with beef and use in Sloppy Jose's

So, for those of you without easy access to Mexican groceries or good carnicerias:

Chorizo
1 pound ground pork (or beef, lamb, yak)
2 T.  cider vinegar
1 T.  olive oil
1 T.  water or red wine
Mix these together in bowl


2.5 T.  New Mexico red chile powder (or smoked Spanish paprika)
1 T.  oregano
1 t.  garlic powder
1 t.  cumin
1 t.  sugar
2 t.  kosher salt
1/2 t.  black pepper
1/2 t.  ground corriander
1/2 t.  cayenne
Mix the dry ingredients in a small dish the mix everything together.
Leave the mixture in the bowl and cover tightly with plastic wrap and stick in the fridge overnight if you have the patience to let the flavors all mix.

Saturday, November 5, 2011

Italian Sausage

I have said it many times: I am a dedicated carnivore.

I especially like when meat comes in the form of sausage. The spices, the portability, the variety of things you can do with it. One of the most adaptable is Italian. Hot or sweet, it works as a link with peppers and onions or browned on your pizza. Growing up, I remember getting really good sausage from the local butcher, cutting the casings off, and browning to add to spaghetti sauce. At college there was a fantastic sandwich shop that made their own hot and sweet italian sausage for their offerings (Primanti's I miss you).

Our local coop has been supplying some wonderful pork from Iowa that started me thinking again about making my own bulk sausage. I found a variety of recipes that use 10 or more pounds of pork to stuff your own. I am not into making that much, but rather prefer to mix my batches a pound at a time.

Italian Sausage
1 lb. ground pork
Mix in
3 T. red wine
Dry Mix
3 T. Italian spices (combo of parsley, oregano, basil, thyme, cilantro, margoram)
1 T. fennel seed
1 T. paprika
1 t. salt
1 t. garlic powder
1 t. black pepper
1/2 t. crushed red pepper
1/2 t. cayenne

Mix the wine with the  pork. Control the heat with the cayenne and make it as hot as you want.Mix the dry ingredients together then with the pork-wine. Use as you would any bulk Italian sausage--pizzas, tomato sauces, garlic soup.

Saturday, June 4, 2011

Buttermilk Grilled Chicken

After a spring of cold and snow, it was nice to have Cousin Kathy and Lulu come for a visit and give me an excuse to grill. Not that I need one of course, but they brought the sun down from Madison and I thought we should take advantage of it. I also thought that I could make this a "no touch raw meat" method.

I generally enjoy working out my own ideas, but I found an outstanding base from one of my college roommates, Karl Bechtel. He posted a nice buttermilk recipe that I decided to modify for my palette. This is easily done on a grill but would also work wonderfully inside the oven if you prefer.

Buttermilk Grilled Chicken

2-3lb  Chicken (I used 1/2 and 1/2 breasts and thighs, Karl used a cut up whole chicken)
2c.  buttermilk
2T.  cumin
1T.  sweet paprika (or use any paprika you want really--like smoked Spanish)
1t.  ground chile powder (not chili powder--use arbol, or NM red)
2t.  oregano
2t.  salt
1/2t. onion powder
1/2t. garlic powder
several good grounds of fresh pepper

Wisk together the dry ingredients then mix in the buttermilk. Put the chicken pieces into a sealable bag (either with tongs or just dump them in) and combine the buttermilk mix and chicken together.

Now, be patient. Let this sit in the fridge overnight or up to about 24 hours or so (you really need at least 4-6 hours for the enzymes in the buttermilk to work their magic on the chicken). If you think about it, go into the fridge once or twice, pick up the bag, massage it a bit, flip it over, put it back, grab an adult beverage, come back later.

About half an hour before you are ready to cook, take the bag out of the fridge, set a rack on a cookie sheet liked with paper towel, use tongs to take the chicken out of the bag one piece at a time, and put them on the rack. Let the chicken drain and come up to room temperature (you should always do this before grilling meats). Get your grill ready. Don't overcook. Enjoy.

As with any recipe there are endless variations you could do with this. Perhaps you could try:
- parmesan, garlic, and chives
- greek spices and dill and use part buttermilk and part yogurt

Put this together with a nice cabbage slaw or maybe some potato salad and your taste buds will thank you. I would love to hear if any of you have tried or liked anything similar.
Thanks to Karl for getting me started on this one.

Saturday, April 16, 2011

Taco Night

I have done it. Most of us have. I grew up on a ton of it. One pound of ground beef, browned, drained, one packet of magic spices (taco, fajita, spaghetti, shashlik, etc.) from the store, water, simmer, eat. It sure is easy and relatively quick. But what is in these packages? Spices (no shit! really?), potato starch, maltodextrin, modified tapioca starch, malic acid, artificial flavors, MSG, and a crap load of salt.
Could we do better at home?
I love the challenge of trying to figure that out.

A couple weeks ago I received an invitation to a taco party, and I thought that this might be the time to figure out if there is a good mix to replicate (or improve) the taste and still have it as easy and quick as the prepackaged mixes. I found a couple packets of taco mix in the cabinet, but they were old--so I chucked them in the trash. Once you find out how easy this is, you will too.

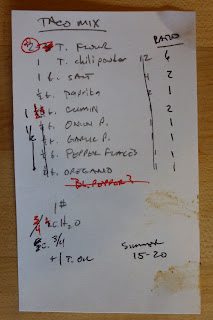
As you might imagine, figuring this out is an iterative process. Here is a little insight to my process. I start with research or ideas on a 3x5 card. Make something. Try it. Adjust. Rinse. Repeat.
Here is the card from this endeavor. I decided to use flour as the thickening agent (rather than corn starch, arrowroot, tapioca), but had to do a few trials to get the liquid amount right. I also like to think about things as ratios rather than actual measurements. It makes things a lot easier to scale and I can use any sized utensil for measurement.

Making the mixes yourself also allows all kinds of flexibility if you want to change tastes to fit your mood. The 1# is for any ground meat (beef, turkey, chicken, lamb, elk), but I really like the buffalo we can get locally. If you want it hotter, add 1 part (1/2 t.) cayenne. Use smoked paprika. Add some ground chipotle for a smokier flavor. How about 1 or 2 parts green chile powder? Add some minced onion or garlic with the browning meat? Up to you. You made it. You now control it. Isn't that so much better?

Make a batch or two and put in an airtight container in the cabinet--now you have it on hand and can make a quick taco dinner anytime. What about using this as a base for a nice queso dip or sauce? Absolutely!

Taco Mix (and their mix ratio)
2 T.  flour (12)
1 T.  chili powder (6)
1 t.  salt (2)
1 t. cumin (2)
1/2 t.  paprika (1)
1/2 t.  onion powder (1)
1/2 t.  garlic powder (1)
1/2 t.  red pepper flakes (1)
1/2 t.  oregano (1)

Mix 3 T. of the taco mix with:
1 lb.  ground meat--browned and drained
1 T. oil
Let those cook together for 3-4 minutes so the flour cooks (making a roux).
Then add
3/4 c.  water
and simmer until thick and heated, stirring occasionally. ~15-20 minutes

 Taking it to the taco party tonight. Let's see what the masses think. Personally, I think it is not too bad.

Saturday, March 12, 2011

Sloppy Joe

The spring allergens are in the air and I really did not feel like going out this afternoon at all. So looking through the fridge, I found some nice local ground beef I had picked up at the Co-op that needed to be cooked. I found a few other things that I thought might be good for a twist on Sloppy Joe's.

If you are used to the sweet SJs out of a can or package, I don't know if you will think this will be for you. If on the other hand you would rather have some vegetables packed into your meat-wich, you might think this one is OK. Easy? Heck yeah. Took me about 45 minutes beginning to end. Sure, I have made SJs with the mixes for years. I keep thinking though that there should be tasty and healthy ways to make the same thing. So, this is what I happened to have in the house. I think that other vegetables (bell peppers, broccoli, peas, corn) could also be added if you want. If you don't want to or are worried about shredding little carrots, only shred 2/3 of each and eat the nub. Yet another way to get veg in you diet.

1 lb ground beef
1 small chopped onion (about 3/4 cup or so)
12-14 mini carrots shredded (1/2 cup-ish)
2 small squash/zucchini shredded (another 3/4 c. or so)--I used one green & one yellow
1/2 tub (4 oz) chopped porcini mushrooms
1 6-oz can tomato paste
3-4 crushed garlic cloves
2 T. olive oil

1 T. chili powder
1 t. paprika
1 t. dried oregano
1 t. cumin
1 t. garlic powder
1 t. salt & fresh ground pepper

Brown the beef in a pan. Remove to a bowl. Saute onion and carrot in olive oil for 5 min or so until soft. The carrot will start to give off natural sugar which will help sweeten the dish naturally. Add squash and mushrooms and mix together. Saute for another 4 or 5 minutes until just starting to soften. Mine looked something like this:
Add beef to veg mixture and stir in tomato sauce and 1.5 cups of water. Add all the spices and stir to mix well. Once it starts to bubble, reduce heat to medium low and continue to cook for 12-15 minutes until the mixture has thickened. If it is still too runny, keep stirring and cooking for a few more minutes--don't worry, you won't kill the dish.

I didn't have any buns or bread in the house, but I did find some Wasa crackers and green chile cheddar. Melt the cheese on the bread (a broiler or toaster oven would be great for this) and top with the SJ mixture.
I think it tastes pretty good and a nice way to get veggies into the carnivore's ball. Give it a try. Play with it a bit. What can really go bad?

I had a couple people ask how much space I have in my kitchen. Well, to be honest, I actually have quite a lot. More than most to be sure. But that is one of the reasons I bought this house. Here is a photo. I am always happy to have folks come join me cooking here. Enjoy!

Monday, February 28, 2011

SULforMSAT #3 - Tuna Casserole Cups

Standup Lunches for Middle School Algebra Teachers: Episode 3

I grew up in the midwest. Admittedly it is not known for great culinary exploits--more for the communal nature of the church basement potluck. I have a collection of these community cookbooks that are filled with all varieties of casserole, hotdish, and one-pot-dinners. The instructions? Mix in oven-proof dish and bake until done. The first of these cookbooks I can recall comes from Wisconsin. Circa 1973. Complete with at least 14 different versions of today's theme casserole.
I expect that many of you would already know the secret recipe. 1 can tuna. 1 can Cream of Mushroom Soup. 1/2 c. milk. 1 small bag frozen peas. 1 pkg cooked egg noodles. Mix. Top with crushed potato chips.  Bake until done. Never seen that before, eh?

I thought it might be fun to try this in the wanton cups for a SULforMSAT alternative. So I started with the classic and made a few modifications. One was in the egg noodles. I didn't think that the ribbon noodles would pack well into cups, I decided to try some smaller pasta. Little stars. I thought they were cute and would add a little binding to the mixture.
1 can Tuna (or chicken or salmon or trout would work too)
1 can Cream of Mushroom Soup (I did try the healthy low sodium & fat option)
1/2 lb. of cooked little pasta bits
1 small onion sauted
1/2 c. milk
6 oz frozen petite peas
6 oz frozen chopped spinach (that I chopped even smaller)
1 cup grated cheddar cheese (I also added a little leftover Parmesan I had in the fridge)
mix it all up in a bowl and bake at 350 for 45 minutes or so. Makes about a dozen or so.

To be honest, the only real measurements in this dish are 1 can and 1 can. Add whatever else you want or like. Pick a different can of cream soup. Add whatever other spices you want. How about canned chicken + frozen broccoli + 1T curry powder?
You can see that I did not top with the potato chips. Mostly because I did not have any in the house. I also think thought that it would make the dish too crumbly and violate rule #3. But I did add the cheese so that made for some browning on the top.

I think that they turned out pretty well. I will subject Heather to them this week (heck, I might even take some for myself).

Sunday, February 20, 2011

SULforMSAT #2

Stand-up Lunches for Middle School Algebra Teachers: Episode 2

This time I tried a new version of an old Gourmet Magazine recipe I have used off and on for years. It originally called for using a pie plate and making one dish, but I like to divide it into individual or bite-sized portions with a little shell. There is a ton of room for creativity with this one.

Cheese Puff Cups

6 eggs
2 T unsalted butter
1/4 c. AP flour
1/2 - 1t. salt
1/2 t. baking powder
1 c. ricotta cheese
1/2 pound grated cheese (cheddar, jack, swiss, gruyere, gouda, whatever you like)
18 or so square egg roll wrappers cut into 4-inch circles (usually you get 20 per pack

melt butter
in small bowl sift (or just stir) together flour, salt, baking powder
in large bowl, beat eggs until doubled in volume ( about 2-3 minutes with an electric hand mixer)
add butter, flour mixture, cheese (and other additions) to egg mixture
in regular greased or sprayed muffin tin, line each cavity with round egg roll wrapper
fill each 2/3-3/4 full
bake at 350 for 30-35 minutes until top is puffed and golden brown and a tester comes out clean

additions I have used (but not all at the same time):
1/2 pound chopped green chile
1/3 pound diced Black Forest ham sliced from the deli counter (with Swiss cheese)
sauteed green & yellow squash with corn
ground pork sausage and chipotle peppers
chopped spinach & artichoke hearts
top with salsa, chipotle sour cream, ranch dressing, ketchup, or anything else that tickles your fancy

Or you could use a mini-muffin tin and used small round wanton wrappers and make great little appetizers.

Stand-up Lunches for Middle School Algebra Teachers (SULforMSAT)

After a semester of teaching Middle School Algebra and getting tired of sandwiches or foregoing lunch all together, my sister-in-law was looking for a new lunch routine. So I decided to set out and find easy recipes that could:

1) be eaten standing up while working with kids in study sessions or ISS
2) be good and tasty either hot or cold
3) not be too messy (crumbs, drips, slops, etc.)
4) be eaten with fingers and not require utensiles
5) be made in batches on Sunday and eaten throughout the week
6) have variety so that the base recipe could be modified to suit tastes and add variety

I figure that some of you might find these helpful or even edible. I would love your feedback on these recipes or other ideas.

Oven-Fried Chicken Tenders

mix together in bowl

1/4 c Dijon
1/4 c Milk (buttermilk might be good)
Ground Black Pepper

Add 1-1.5# uncooked chicken tenders. I can get them already cut in the meat section of the store. Use tongs if you want so you never have to touch them.
Soak chicken in mix for 10-15 min.

Crush 1-1.5c. of goldfish crackers (I used the cheddar ones, my brother likes the Parmesan flavor--I would add parm cheese to those). Use small food processor to get very fine. I crushed mine in ziploc bag with rolling pin, but that might be too coarse. Dredge chicken in crumbs until coated.

I put parchment paper on baking tray. Spray top with cooking spray. Bake at 425 for about 20 min.

Serve with parmesean roasted red potatoes or sugar snap peas.